Connecting a website to Google Search Console and verifying it is an essential step for webmasters and site owners to monitor their website’s performance on Google search results and identify any potential issues. Here’s a step-by-step guide on how to set up it properly using all available verification methods.
Use my templates like Google Search Console Looker Studio Template, Keyword Ranking Report Template, and Keyword Cannibalization template to analyze Search Console data more easily and find more insights from search performance raw data.
// Also, don’t miss out on subscribing to my email newsletter, where I share my new Looker Studio templates and SEO experiments.
Content
- Sign in or create a Google Account
- Open the Google Search Console website
- Choose a property type and add a property
- Choose a method and verify your property ownership
- Start using Google Search Console
- Tip #1. Use two and more properties for big websites
- Tip #2. Use two and more verification methods for the same property
- Tip #3. Be careful with sharing access to the Search Console property
1. Sign in or create a Google Account
If you don’t already have one, you’ll need a Google account to use Google Search Console. Sign in to your existing Google account or create a new one at https://accounts.google.com.

Experienced webmasters often have two and more Google Accounts to test different tools and store different projects under different emails. In such case, you should make sure that you log in to the right Gmail address. Just click on your profile icon to know which email Google Account you are using now.
2. Open the Google Search Console website
Visit this link https://search.google.com/search-console/.
If you already have any added projects under your Gmail address you will be redirected to the Performance page of the first added website. In this case, click on the project in the left sidebar and click Add property.
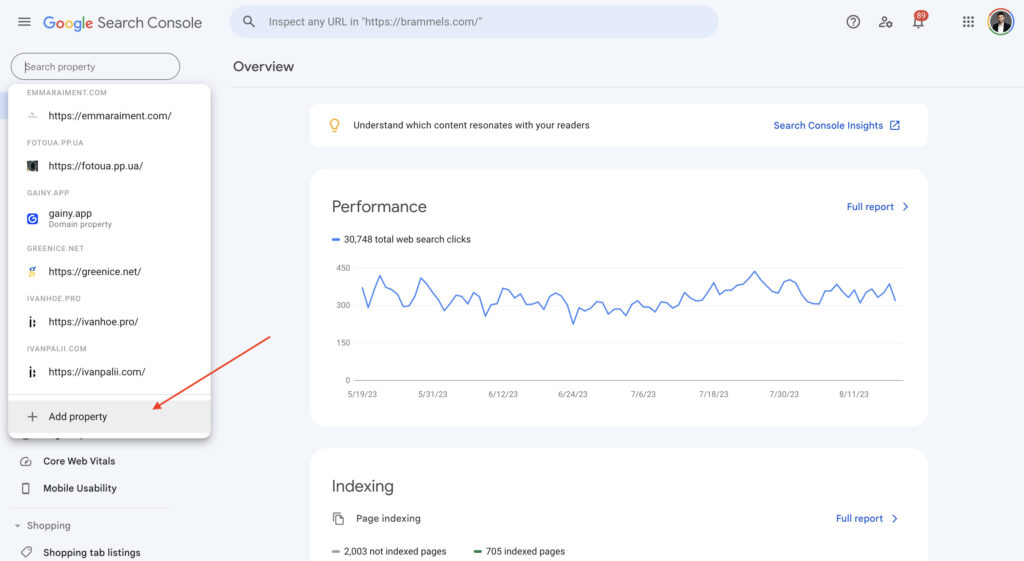
If you have no added projects yet you will immediately see the welcome screen, where you can add your first website.

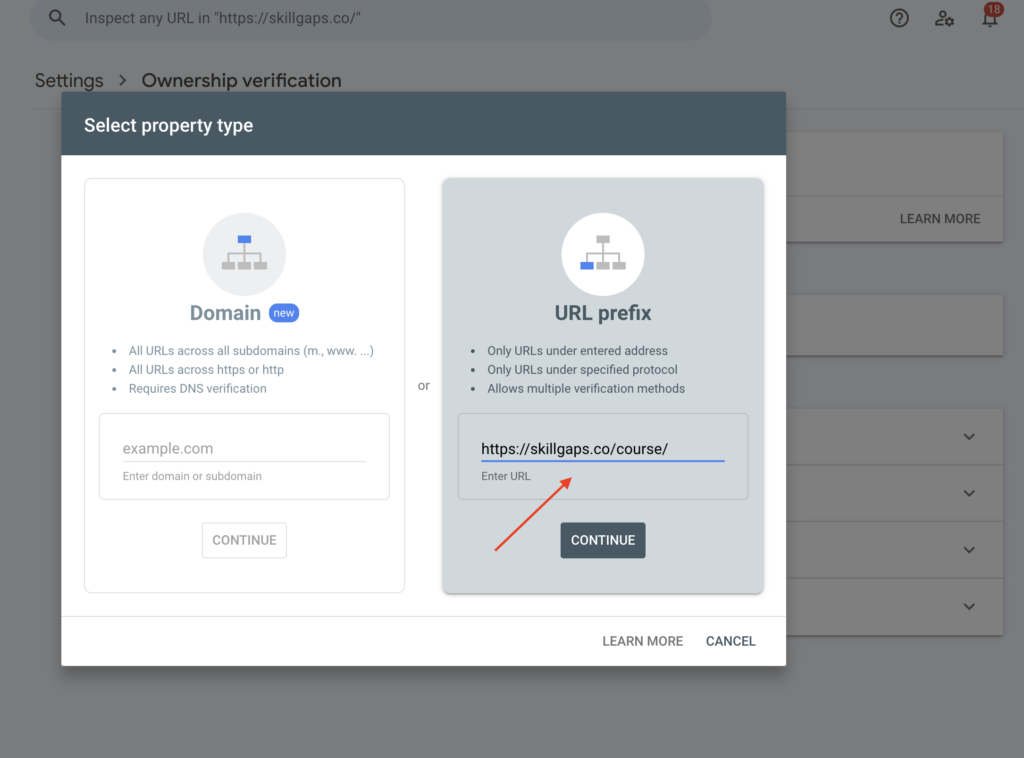
3. Choose a property type and add a property
This Search Console guide can help understand how property types differ.
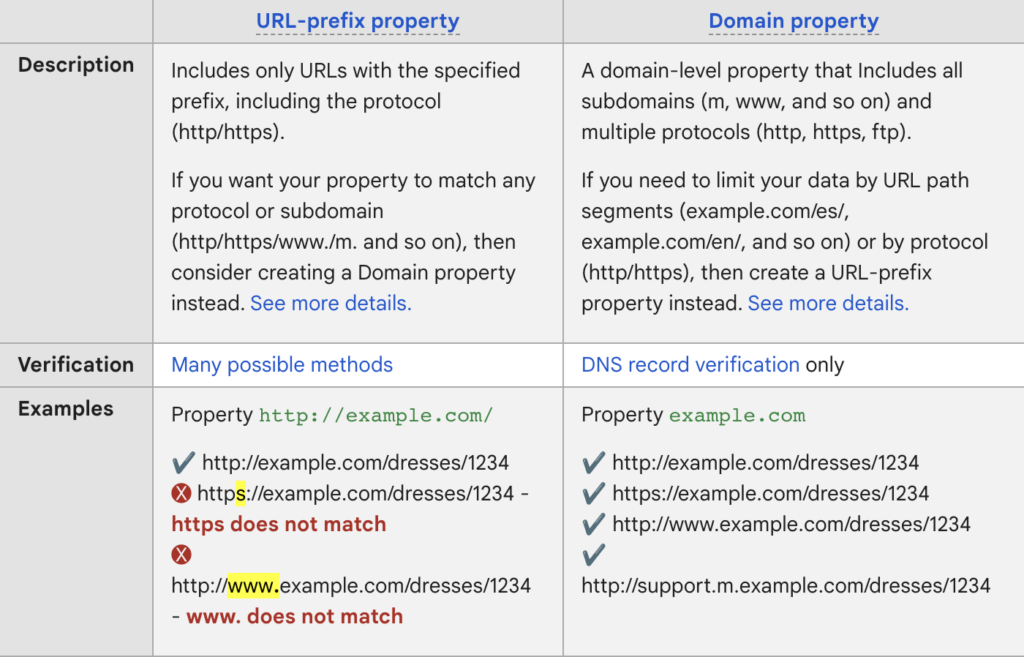
Choose Domain type if:
- your website has subdomains and you want to track all of them in one property;
- you have access to your Domain Name System (DNS) account.
Choose URL prefix type if:
- you want to track only a specific domain address without any subdomains;
- you want to verify your property using another method, without DNS verification.
Usually, DNS verification is the most difficult method for verifying a website, especially for beginners. It is also difficult when you work on the customer’s website and has no access to the domain name provider account, so you should spend some time communicating with the website owner to get access to DNS.
In most cases, I create a URL prefix property type.
4. Choose a method and verify your property ownership
Google Search Console offers several verification methods. You can choose the one that’s most convenient for you.
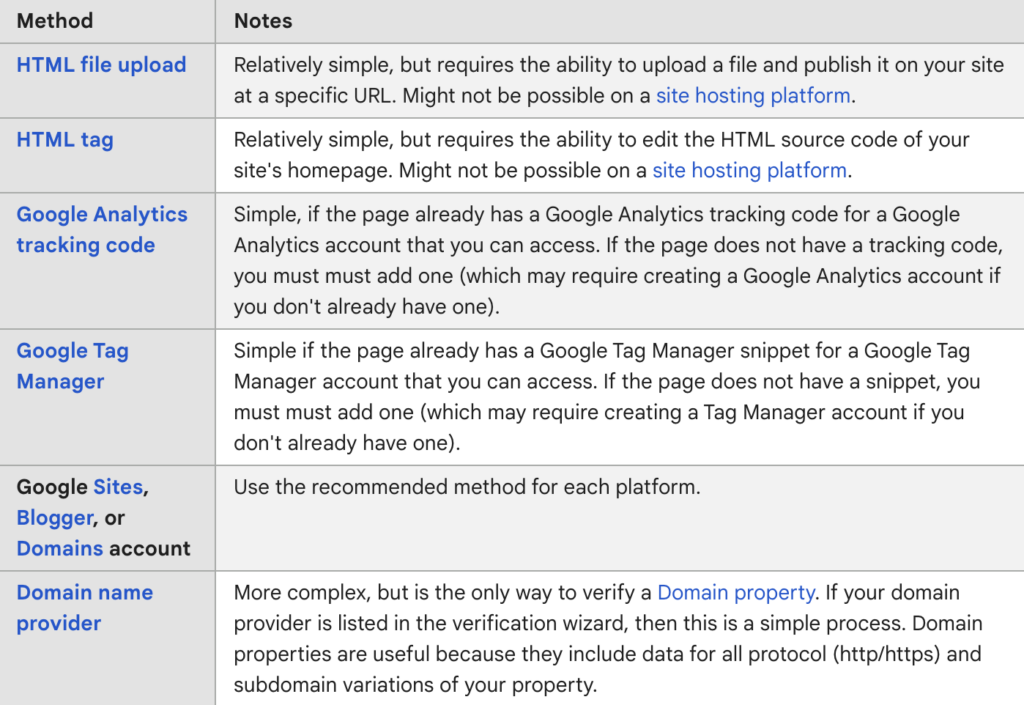
4.1 HTML file upload
This method involves uploading an HTML file to your website’s root directory. Select the “HTML file upload” option.
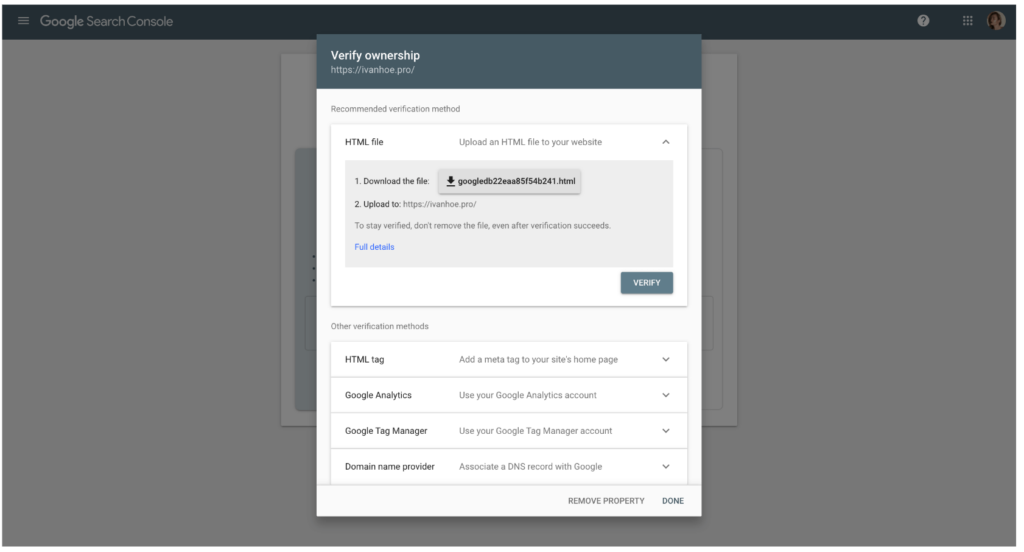
Download the HTML file provided by Google (this file is unique to you, it cannot be used to identify anyone else and is associated with your Gmail account).
Upload this HTML file to your website’s root directory using an FTP client or your hosting control panel.
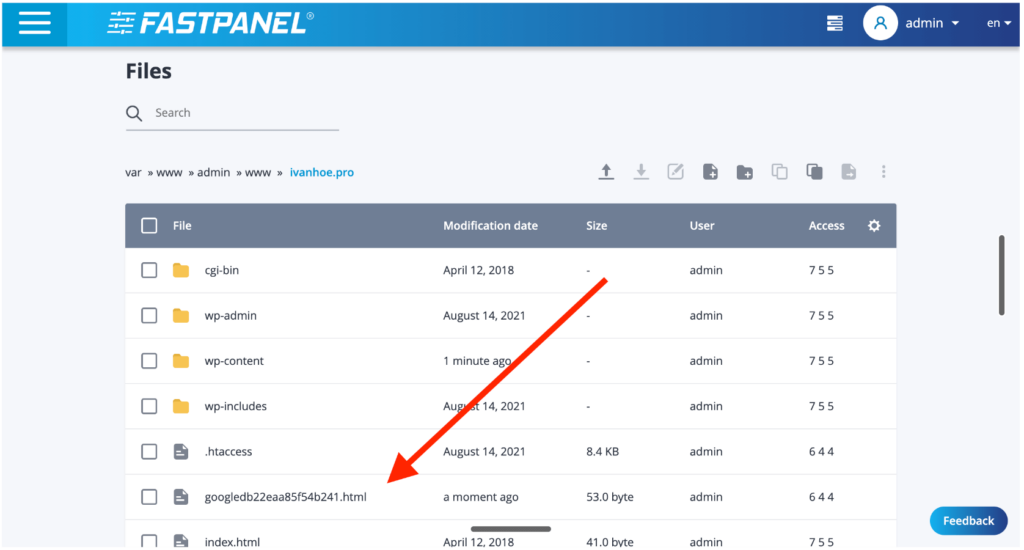
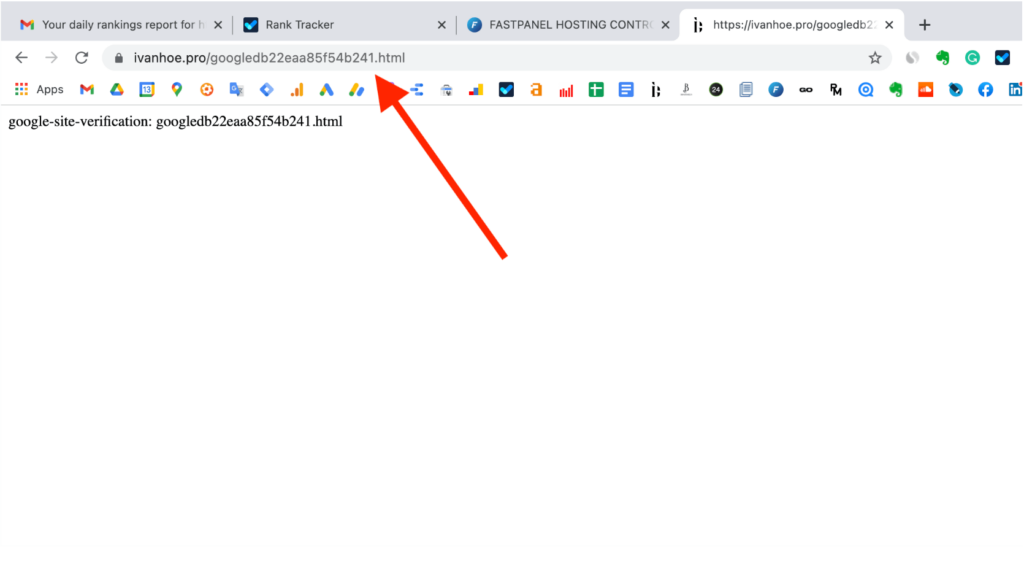
Confirm that you can see the file by visiting it in your browser in the location specified by the Search Console verification wizard. If the file isn’t available to your browser at that URL, Google won’t be able to find it for verification purposes.
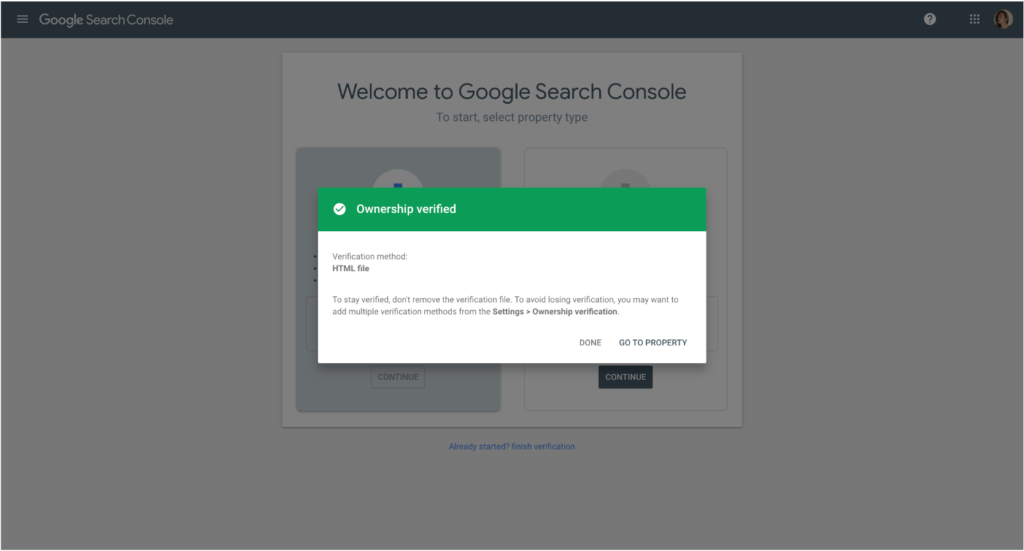
Click the “Verify” button in Google Search Console.
Often website owners ask: “Can I upload a Google Search Console HTML file to WordPress admin without using an FTP client”? I guess you can do that if you have a specific plugin.
If you will try to upload a verification file to the WordPress library you will see such an error.
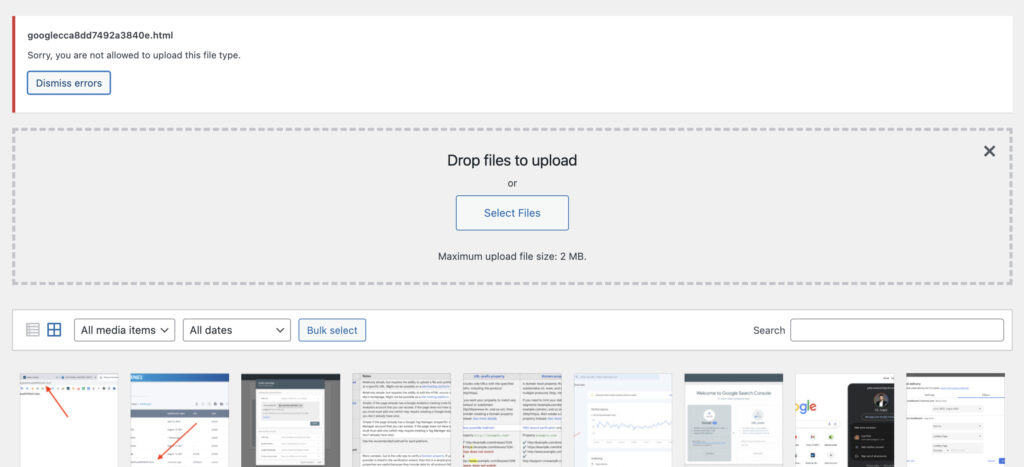
So, my tip is to use FTP. Sometimes it’s more difficult for newbies, but you should train your skills in this field. And setting up a plugin only for uploading one HTML file to the site is not a good practice. Because every plugin takes resources and can cause security issues.
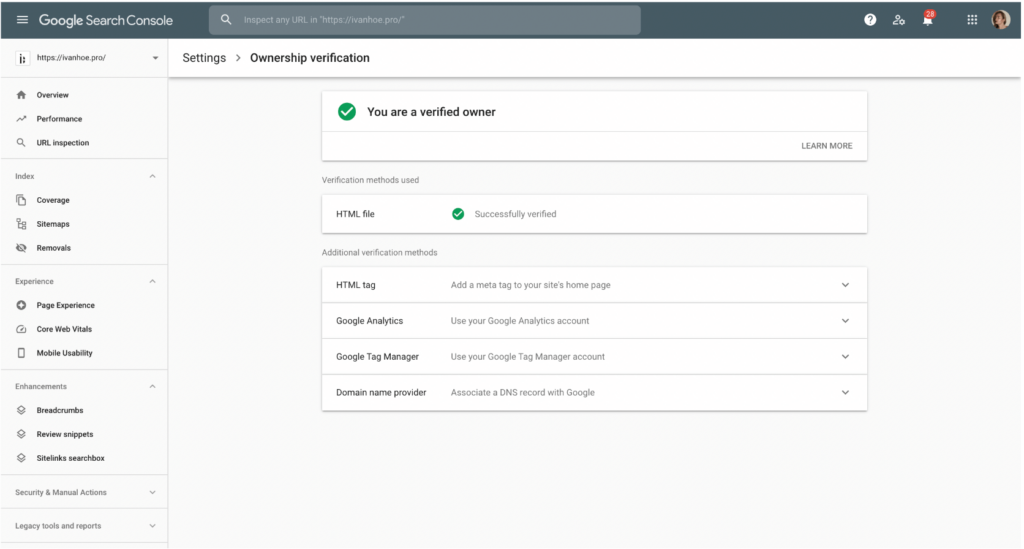
After completing these steps you can go to the property. If you want to verify this property ownership using other methods, go to Settings > Ownership Verification.
4.2 HTML tag
This method involves adding an HTML meta tag to your website’s homepage.
Select the “HTML tag” option and copy the meta tag provided by Google.
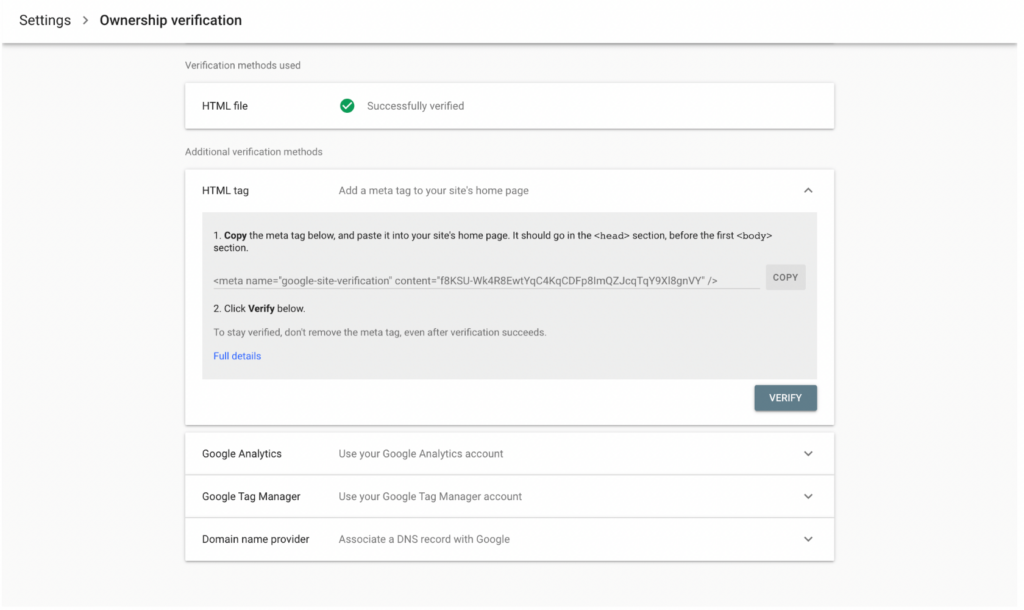
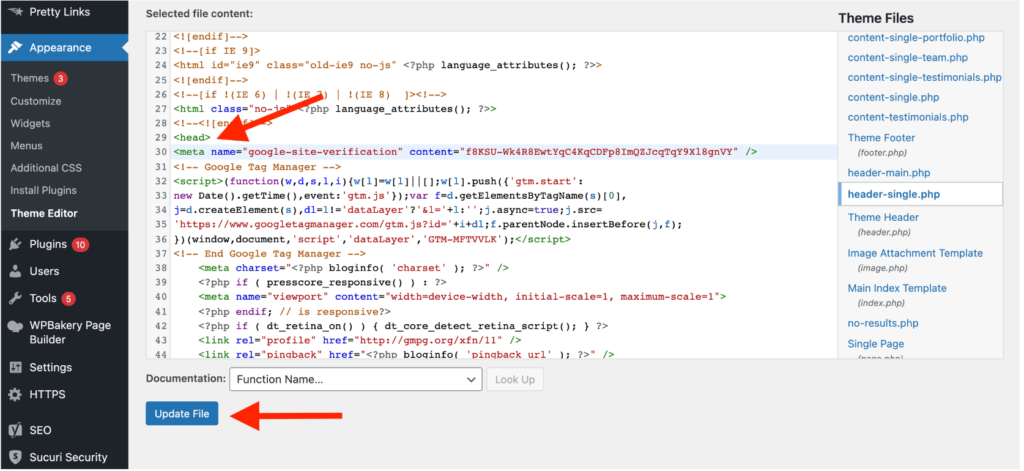
Go to your website’s HTML code and paste the meta tag into the <head> section of your homepage. Below is an example of how I did it via WordPress Theme Editor.
Save your changes and return to Google Search Console. Click “Verify.”
4.3 Google Analytics 4
If you already have Google Analytics 4 set up for your website, you can use this method.
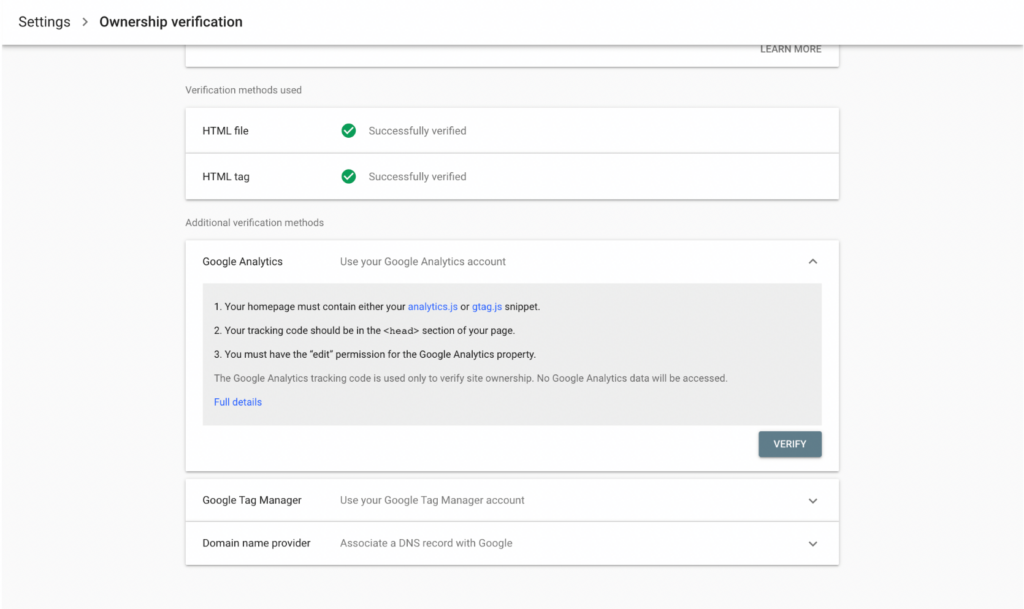
To do that:
- You must have “edit” rights for the Google Analytics 4 account used by that page;
- You must use the same Google account for both Search Console and Google Analytics 4;
- Your homepage must contain either the analytics.js or gtag.js snippet. The tracking code must be in the <head> section, not the <body> section, of your page.
Important note! If you have installed Google Analytics 4 via Google Tag Manager, you won’t be able to verify the ownership using this method. Here is what you will see in GSC.
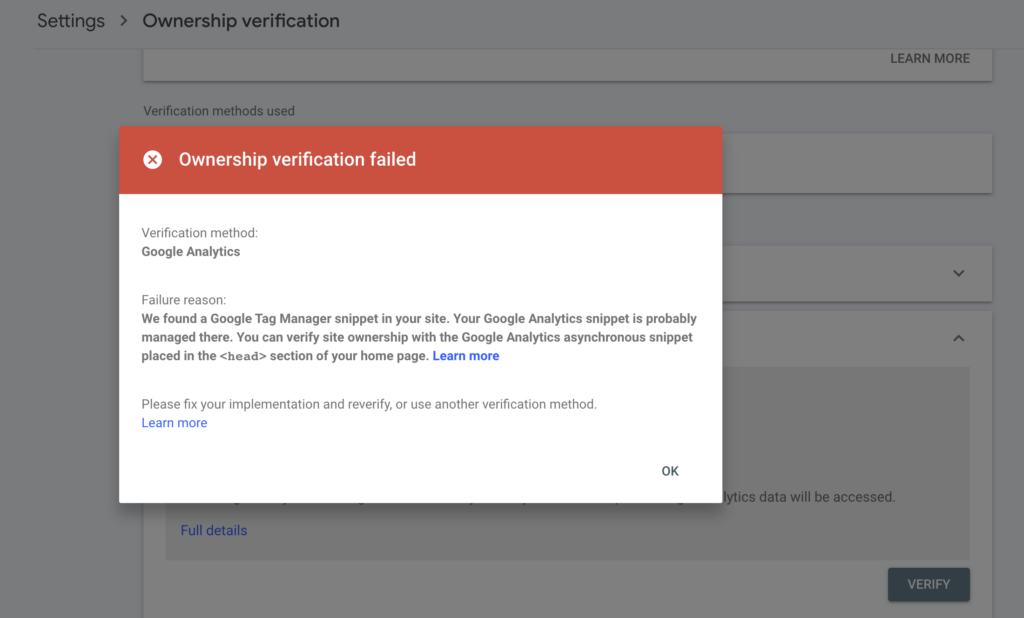
So, use this verification only if you don’t plan to use Google Tag Manager. As I like to use GTM, I miss this step and move further. To use this verification method, add Google Analytics 4 code to the website as described in this guide about setting up GA4 for a website. And after that click “Verify” in Search Console.
4.4 Google Tag Manager
If you’re using Google Tag Manager, you can verify your site using this method.
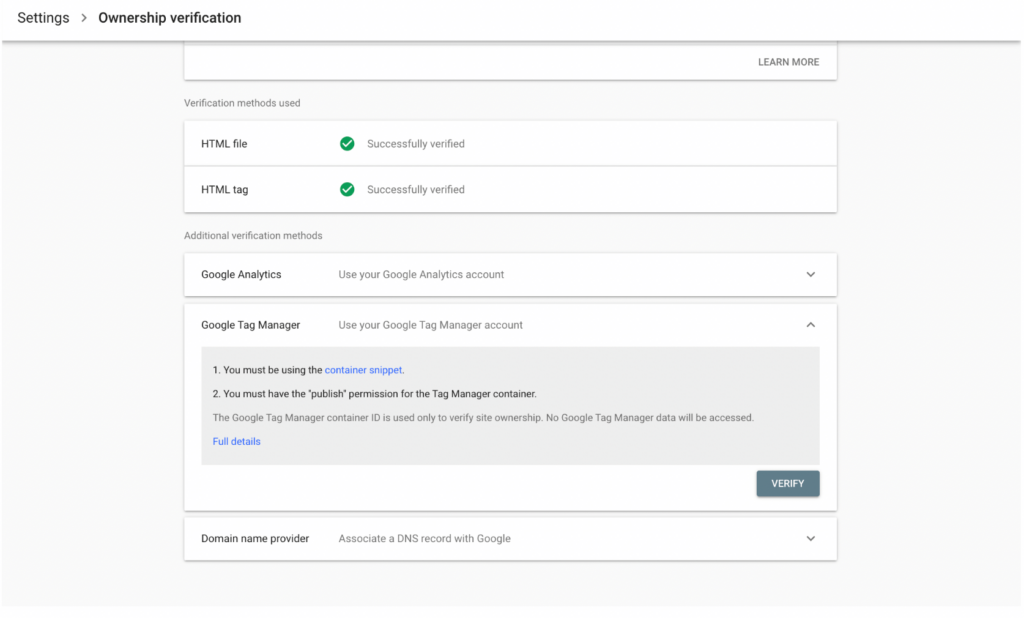
To do that:
- You must have Publish permission for the Google Tag Manager container on the page;
- You must use the same Google account for both Search Console and Google Tag Manager;
- Your homepage must contain the correct tag in the correct location. The <noscript> portion of the Tag Manager code must be placed immediately after the opening <body> tag of your page. If it is not, verification will fail.
Use this original guide to set up the Google Tag Manager container, if you have not installed it yet.
4.5 Domain name provider
Verifying a domain is essential for validating a Domain property, and it can also serve to confirm a URL prefix property. This verification process entails submitting a record to your domain name provider’s record list. It may necessitate a basic level of technical proficiency.
You have the option to verify ownership of either subdomains or root domains. When you verify ownership of a root domain, it automatically extends ownership validation to all subdomains. However, confirming ownership of a subdomain does not extend ownership validation to the parent domain.
Select the “Domain name provider” option and choose your domain registrar from the list or follow the general instructions provided.

Log in to your domain name provider and open specific domain settings.
Add your Search Console TXT record to your domain’s DNS records.
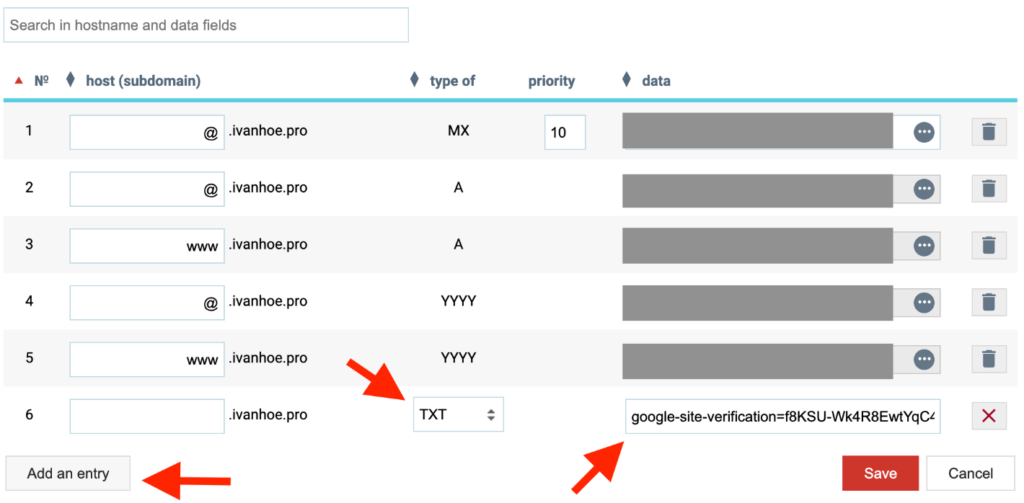
Once you’ve added the TXT record, return to Google Search Console and click “Verify”.
5. Start using Google Search Console
Congratulations! Your website is now connected and verified in Google Search Console. You can start exploring the various features and tools available to monitor your website’s performance and address any issues that may arise in Google search results.
You also can connect Google Search Console to Google Analytics 4 property to merge data from GA4 and Search Console and get more insights.
Tip #1. Use two and more properties for big websites
I recommend setting up specific URL prefix properties for every specific segment of content if you properly use subfolders on the website.
Why it’s important?
- You will get specific Google Search Console Insights reports every month separately for every content segment.
- You’ll be able easier analyze the search performance of the specific segment in the Search Console interface and in the Looker Studio Search Console template.
- You’ll get fewer problems with data sampling in Search Console. For example, by default, you can view only 1000 rows of indexed landing pages and ranked search queries in the standard GSC interface. If you have a big website you need t view more. Creating separate properties for every subfolder helps to get more.
In my example, I create separate properties for my Skillgaps project:
- /course/
- /school/
- /teacher/
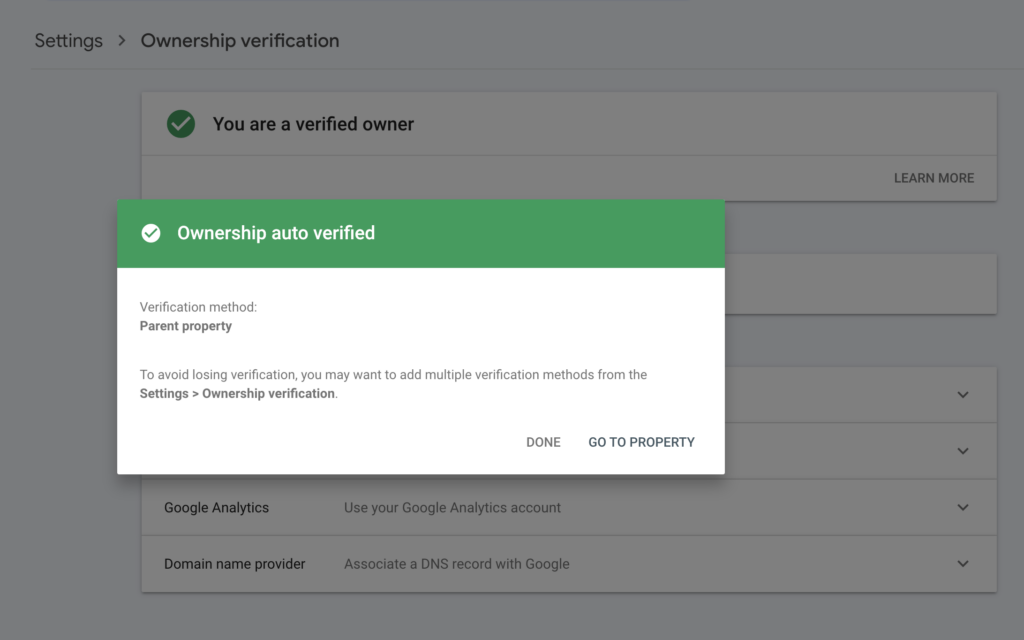
And what’s important is that I don’t verify the new URL prefix property of the same website again. Ownership is auto-verified via parent property verification method.
My new properties immediately appear in the properties list in the left sidebar.

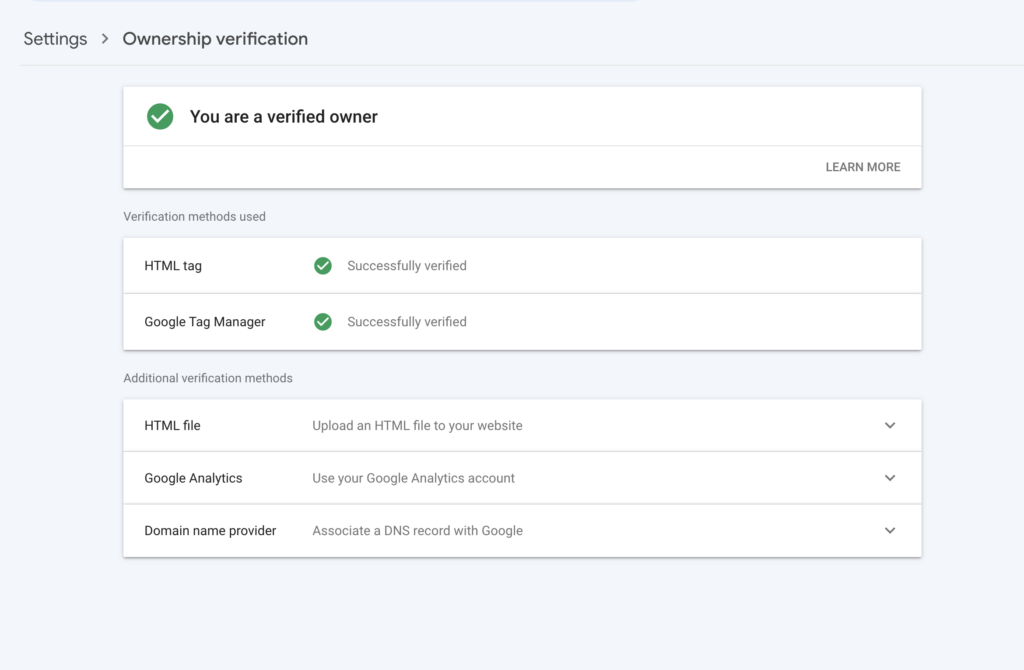
Tip #2. Use two and more verification methods for the same property
This is especially important if you are not the only one who works with the website. Sometimes developers can delete the HTML tag or Google Analytics 4 tag or Google Tag Manager tag from the code releasing a new version of the website and you will lose access to the search performance data for some time.
When you have more than one verification method there is less probability of such an issue.
Tip #3. Be careful with sharing access to the Search Console property
Remember that search performance data is very valuable data to measure your website performance and research your market. In the guide on how to check traffic to any website, I explained that click-stream data tools are a good solution for market research but they are not as accurate as Google Search Console data.
So if competitors will get this data they can quickly optimize their content roadmap to target valuable keywords they don’t think about before. Yes, they still will have no data on your conversion rates but keyword research data is valuable too.